venerdì 23 dicembre 2011

iWorlds:Tecnologia sempre a portata di mano

                                                          iWorlds

http://www.iworlds.it/ La tecnologia si sta evolvendo, rimanete al passo!!http://www.iworlds.it/ I mondi Informatici. Recensioni AppStore, News Apple, Microsoft e Open Source, Sony (PS3) e Nintendo. Informazioni nuovi software e firmware, Test per iPhone.
DA VISITARE.

mercoledì 7 dicembre 2011

Razor 1911:LA STORIA


Razor 1911 è il nome di un gruppo di coders di demotrainerchiptune e warez operanti a partire dall'ottobre 1985, inizialmente sui sistemiCommodore 64 e poi passati all'Amiga e PC. Sono molto conosciuti soprattutto per la diffusione pirata dei giochi e per la creazione di crack ekeygen. Secondo la divisione crimini informatici del Dipartimento di Giustizia degli Stati Uniti, è il più antico gruppo di pirateria di videogiochi presente su Internet[1].

Indice

  [nascondi

Nome [modifica]

Il gruppo è nato come Razor 2992 in Norvegia, fondato da tre membri: Doctor No, Insane TTM e Sector9. Poco tempo dopo 2992 è diventato 1911: molti altri gruppi della cosiddetta scena avevano infatti il numero 666 nel loro nome; scherzosamente decisero di cambiare 2992 in 1911, che in notazione esadecimale corrisponde a 777[2].

Membri arrestati [modifica]

Negli Stati Uniti, durante la cosiddetta Operation Buccaneer (operazione bucanieri, 11-12-2001), sono stati arrestati diversi membri di gruppi tra i quali uno dei leader dei Razor, Shane E. Pitman detto "Pitbull". Nel 2003 un altro leader, Sean Michael Breen, è stato arrestato e condannato a 50 mesi di carcere e restituzione di 690.236,91$ alla Cisco Systems, alla quale aveva ordinato diverso materiale per rivenderlo sul mercato "nero" fingendosi un cliente. Il gruppo si è fermato fino al 2006, cioè dopo l'uscita dal carcere di Breen.

Ritorno [modifica]

Nel 2006 il gruppo è ritornato sulla scena, dimostrandosi uno dei più prolifici insieme a RELOADED. Nel 2007 il gruppo ha crackato il videogioco Shadowrun di Microsoft, facendo in modo che, pur richiedendo Windows Vista, potesse funzionare correttamente sotto Windows XP[3]; in seguito hanno realizzato una patch similare per la versione pc di Halo 2, dimostrando che il requisito di Vista era in realtà solamente un modo per spingere le vendite del nuovo sistema operativo. L'atteso Crysis è stato rilasciato nel circuito warez cinque giorni prima dell'effettiva data ufficiale[4].

GUIDA C++ PER PRINCIPIANTI:Parte 1

La programmazione è indispensabile per creare applicazioni,tool e utilities.E' anche uno strumento che favorisce il ragionamento dell'individuo,in quanto è basato su formule matematiche e basi scientifiche.Oggi vi mostreremo come creare una semplice applicazione che possa permettervi di calcolare l'area di un Triangolo Equilatero.
Innanzitutto bisogna cogliere i principi di un concetto che vogliamo concretizzare virtualmente.Per esempio,noi sappiamo che il Triangolo Equilatero possiede delle dimensioni(Quelle che ci servono per calcolare l'area),ovvero il numero fisso(0,433) e il lato(che dovrà essere elevato alla seconda).Per questa lezione dobbiamo conoscere principalmente alcuni comandi che ci saranno utili in questo caso,ovvero:
-Il comando FLOAT;
-Il comando printf o cout(Che stampano l'input)N.B:In base al compilatore che si utilizza possono cambiare alcuni comandi(Se usate DEV-C++ scrivete "cout",se utilizzate Visual C++ scrivete "printf" o "std::printf"(std richiama un comando interno del compilatore per aggiungere un comando che in questo caso è"PRINTF")
-il comando "FORMULA"(Invece di scrivere FORMULA dovete inserire il nome dell'incognita che si vuole calcolare,in questo caso è l'area)
-il comando "System("PAUSE"),per impedire all'applicazione di chiudersi automaticamente

ESEMPIO DEL CALCOLATORE DELL'AREA DEL TRIANGOLO(C++):
//main.cpp
//esempio

#include<iostream>

int main()
{
float lato;
float numerofisso = 0.433;
float area;

std::cout << "INSERISCI IL LATO:";
std::cin >>lato;
std::cout << std::endl;
area = lato * lato * numerofisso;
std::cout << "L'AREA E':" << area << std::endl;
system("PAUSE")
}


Provate a scrivere ciò nel vostro compilatore ed eseguite il debug(Osservate la foto).


IL RISULTATO E' UN CALCOLATORE DELL'AREA DI UN TRIANGOLO EQUILATERO.
RICORDA:
-Utilizzare sempre il punto e virgola nei comandi(OSSERRVARE LA FOTO SOPRASTANTE)
-Se il Debugger rileva problemi riguardanti dli identificatori,utilizzare "std::(comando)"
-Utilizzare sempre { e } rispettivamente per l'inizio e la fine del corpo dell'applicazione


                                                          DOWNLOADS:
Microsoft Visual C++ 2010 Express(Pesante ma completo):Scarica QUI
Dev C++(Leggero ma incompleto):Scarica QUI


Consigliamo di utilizzare Visual C++ 2010,poichè è il programma utilizzato nella GUIDA.


FINE DELLA PRIMA PARTE.

Windows 8 Beta in arrivo a fine Febbraio 2012.

                                          
A SanFrancisco,dopo l'evento,Microsoft ha confermato che la [BETA] di Microsoft Windows 8(Ovvero Tatooine) sarà disponibile entro la fine di Febbraio 2012 .Non è ancora sicuro che si possa effettuare l'aggiornamento dalla Developer Preview ma si sa per certo che la Beta release includerà Windows Store e altre applicazioni.


Windows 8 Consumer Preview


29 FEBBRAIO 2012


martedì 6 dicembre 2011

Overclock di:ATI Mobility Radeon HD 4570


Oggi vi mostreremo come Overclockare la ATI Mobility Radeon HD 4570 con l'uso di RivaTuner.Abbiamo testato la GPU,il Clock Massimo e a Frequenza di Memoria massima;La frequenza massima stabile per il clock è di[749 MHz],memoria[849 MHz].
                                   VIDEO(Grazie allo staff di PCUltraMaster):


                            TUTORIAL:
1.Aprire il file Rivatuner.cfg e cercare "RV710"
2.Aggiungere la scritta "9553h" accanto agli altri
3.Chiudere e salvare.Aprire RivaTuner.Cliccare sul pulsante accanto.
4.Alzare il clock e la memoria rispettivamente a 749 MHz e 849 Mhz.Non superate la soglia di 850 MHz!


lunedì 5 dicembre 2011

Aggiornamento Xbox Live in arrivo domani.


                     IN ARRIVO 6 Dicembre 2011.
Screenshot of the new Xbox 360 dashboard

Xbox 360 DVD Drive Model Detector v.1.0

Lo staff di PCUltraMaster ha risposto alle esigenze di alcuni gamer che aspettavano un'applicazione aggiornata automaticamente dai server di PCUltraMaster.Noi abbiamo creato "X360DMD" ovvero "Xbox360DvdDriveModelDetector".E' una semplice applicazione che rileva il drive della vostra console Xbox 360
                                                 .
LINK:DOWNLOAD
[UPDATE]L'archivio .RAR è stato caricato anche su Se7enSins.

Scovato il File System ReFS in Windows 8


Fino alla build 8139 di Windows 8 esisteva un file system nascosto chiamatoProtogon, utilizzabile solo da linea di comando e ancora in un evidente stato embrionale. Nelle ultime build Canouna ha scovato un nuovo file system, questa volta utilizzabile da interfaccia grafica, che prende il nome di ReFS (Resilient File System).


Anche in questo caso si tratta di qualcosa di poco interessante per l'utilizzatore finale, basti considerare che non è possibile installare Windows 8 su una partizione formattata in ReFS.

Non si hanno molti dettagli tecnici su questo file system, ma dovrebbe trattarsi dello stadio definitivo di Protogon, che a sua volta era un'evoluzione del defunto WinFS.
ReFS è caratterizzato dal supporto ad alcune caratteristiche tipiche dei database (tabelle, colonne, transazioni, cursori, ecc), proprio come vi avevamo spiegato per Protogon un po' di tempo fa, quindi se il progetto avrà successoverrà utilizzato solo sulla versione Server di Windows 8.

Possiamo stare tranquilli perché NTFS è più che sufficiente per avere un eccellente Windows 8 in ambito domestico e professionale, proprio come ce lo sta raccontando Microsoft nel corso di questi mesi, ma siamo certi che si stia lavorando costantemente su un nuovo file system per rilasciarlo quando sarà veramente utile e rivoluzionario, proprio come è accaduto nel passaggio da FAT32 a NTFS.
Articolo di Windows 8 Italia(Grazie allo staf di Windows8Italia)

Intel Core i7 3960X SandyBridge-E


Dopo tanta attesa siamo giunti finalmente al giorno del debutto dei Processori Intel SandyBridge-E che, insieme al chipset X79 Express, danno oggi vita alla nuova piattaforma Enthusiast della casa di Santa Clara, sostituendo di fatto la “matura” accoppiata Gulftown/Boomfield – X59 che ci tiene compagnia da oramai 3 anni.
Ads by Google
Ybris Coolingi migliori componenti per il tuo raffreddamento a liquido.www.ybris-cooling.it

Tavolette grafiche WacomPerfette per il disegno digitale. Le nuove tavolette Wacom Bamboo!it.shop.wacom.eu/Bamboo
I SandyBridge-E mantengono sostanzialmente l’architettura che già avevamo apprezzato sui SandyBridge Core i7 LGA 1155, con lo stesso processo produttivo a 32nm, ma opportunamente adeguata alla fascia high-end del mercato, sia per performance che per dotazione e capacità di espansione.
Nel ciclo di sviluppo Intel infatti SandyBridge-E con socket LGA 2011 viene inquadrato, come la versione mainstream (LGA 1155), nella fase Tock:
Dovendo in “linea di successione” continuare la tradizione dei CORE i7 LGA 1366 a 4 e 6 Core (i7 990X in primis) la nuova proposta Intel prevede la stessa tipologia di offerta con modelli di Processore QuadCore ed Esacore e Tecnologia HyperThreading attiva.
Nel corso di queste ultime settimane abbiamo più volte ribadito le features principali di queste CPU e molti dei nostri lettori le conosceranno bene, tuttavia cerchiamo di riproporle riassumendole ora in maniera più ordinata.
Cominciamo intanto a conoscere i modelli che Intel presenterà sul mercato; il produttore ha mantenuto anche in questo caso i due brand Core i7 e Core i7 Extreme per diversificare e meglio identificare l’offerta. Attualmente sono noti tre processori SandyBridge-E Core i7:
I7-3960X – i7-3930K – i7-3820

Di questi il Core i7-3960X è il modello di punta Extreme Edition, mentre l’i7-3930Kappartiene sempre alla fascia alta (sbloccato per l’overclock) ma con un prezzo più accessibile; il Core i7-3820 è invece un processore Quad-Core che possiamo definire il modello Entry-Level per i SandyBridge-E, ma verrà presentato solo a inizio 2012.
Nella tabella seguente potete confrontare le caratteristiche di tutti i processori SandyBridge Core i7:

Rendere una Radeon HD 6950 una GPU HD 6970


Introduction

(GUIDA IN INGLESE)
A few weeks ago AMD released the Radeon HD 6970 and Radeon HD 6950. Both cards are based on AMD's new Cayman core which is their first graphics processor to use a VLIW4 shader configuration.

Just like on all other similar products, AMD's two Cayman variants, called Cayman Pro and Cayman XT, are based on the exact same GPU silicon. The model variant a GPU chip becomes is decided after the die is produced, at some point before it is put on the card. Creating new SKUs from the same silicon by locking features has been common practice in the industry since at least the Radeon 9500 in 2002.

This article is to unlock the Radeon HD 6950. The HD 6970 has nothing that can be unlocked.

Please Digg Reddit this story to spread the word.


The picture above shows the disabled HD 6950 shaders in red. When unlocked, these deactivated units become active, resulting in a substantial performance increase.

AMD has two methods of locking the shader count on all of their recent GPUs. The first one relies on fuses inside the GPU, or on the substrate - a mechanism similar to Intel's multiplier locking. It is not reversible as far as we know. The second mechanism is the one we are interested in, AMD can configure the VGA BIOS in a way that it disables extra shaders, in addition to the ones disabled via the on-die fuses. This method is mostly used to create engineering samples or reviewer cards that match the target specifications. Usually production cards come with the shader count configured in the fuses, so that it can not be changed.

Apparently currently shipping Radeon HD 6950 cards from all manufacturers - which actually are all the same card with different sticker - have their shaders locked via the BIOS method, so we can exploit it easily.

Unlocking the shaders


Unlocking the additional shaders is done by flashing the card with a HD 6970 BIOS. You can find a few in our VGA BIOS collection. Any of these BIOSes will work on any reference design HD 6950 card. You could use the ASUS BIOS which comes with higher clocks & Overdrive limits and enables voltage changes via SmartDoctor, or stick with one of the reference BIOSes in case you are afraid the clocks might be too high.

I will describe the method for flashing from within Windows, which is safe enough on these cards because of the dual BIOS feature that enables easy recovery.
  1. Grab ATI Winflash from here (32 & 64-bit).
  2. Download HD 6970 BIOS. The Sapphire one I linked to will work on all reference design cards from any vendor.
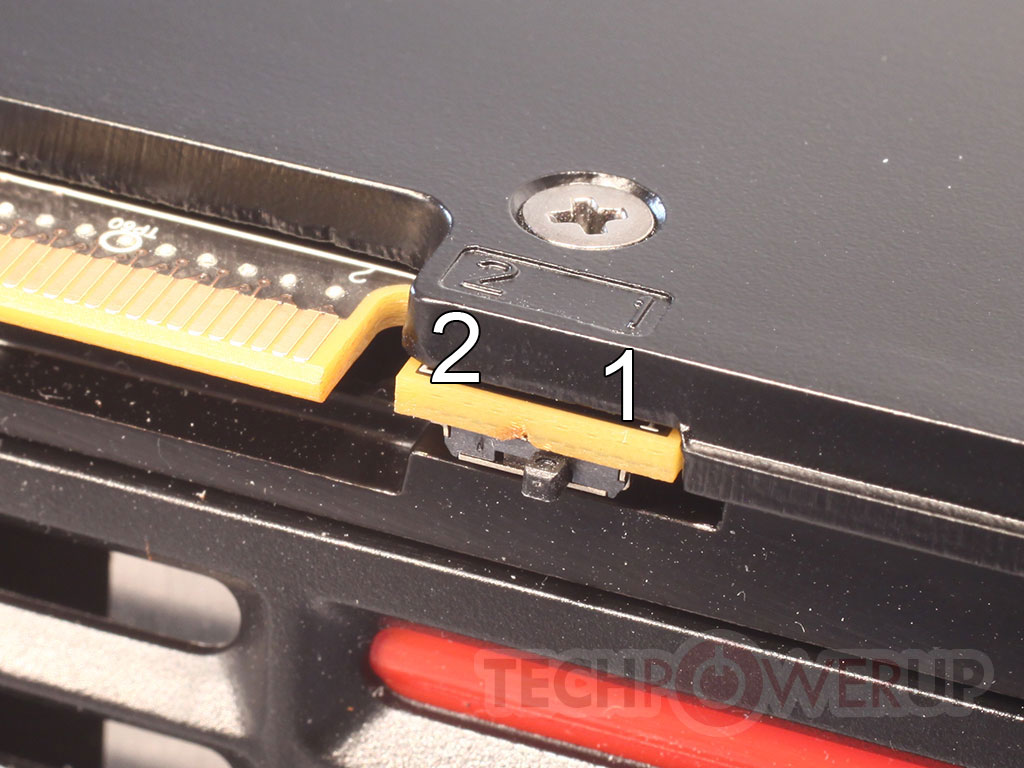
  3. Make sure the BIOS switch on the card is set to the 1 position (pictured further down if you don't know where it is).
  4. Run ATI Winflash, click Save to save your BIOS, so you have a backup in case something goes wrong.
  5. Load the HD 6970 BIOS into Winflash by clicking Load Image, followed by Program.
  6. Let the flashing process complete and reboot your system.
  7. Check the shader count using GPU-Z, it should show 1536. Make sure you use version 0.5.0 or newer, the official 0.4.9 version does not support HD 6900 Series properly. If you see a shader count of 1600, your GPU-Z version is outdated.
  8. To ensure maximized performance open Catalyst Control Center, go to the Overdrive tab and set the PowerTune slider to the +20% setting. The "Testing" section of this article has more data on that.
  9. Check stability in Windows desktop applications and games.
If you get an error like ID mismatch or Could not erase ROM, then you'll have to do some extra work in a Windows command prompt (or DOS): Run atiwinflash -unlockrom 0 followed by atiwinflash -f -p 0 bios.bin where bios.bin is the path and filename of the HD 6970 BIOS you downloaded.

Update: I have uploaded a pack of all the files required together with some batch files to ease the process for less experienced users. You can download it here, please report success or any issues with the scripts in the comments for this article.

Update 2: Above method is only for 2 GB HD 6950 reference design cards. If you have a custom design or 1 GB card, then use RBE to modify your existing BIOS. Save the BIOS from your card, load it into RBE, enable the shader unlock option on the last tab, then flash that modified BIOS to the card instead of the one downloaded from this page.

Feel free to post in the discussion thread for this article if you need additional assistance with the flashing process.

Testing


We can see that enabling the shaders without any clock increases improves performance. Once the clock speeds are adjusted to match the HD 6970, the card effectively performs just as well as a full blown Radeon HD 6970.


I did some additional power consumption tests and it seems that AMD's PowerTune power limiting system does not get "upgraded" by the BIOS flash. We see that even when modded, the HD 6950 (at HD 6970 shaders and clocks) runs into the PowerTune limit earlier than the regular HD 6970 which results in reduced power draw but also reduced performance in Furmark. With a power consumption of 202 W, the modded HD 6950 is well below the 225 W specification limit of the HD 6950 power configuration.
Once we up the power limit in Catalyst Control Center by +20%, we see that the modded HD 6950 draws 252 W, which exceeds its specification (225 W) by 27 W. This move also improves rendering performance by a good deal, so I would recommend it to all users who perform this mod and have a half-decent powersupply. Going 12% beyond the specified power limit will not have any ill effects on your hardware and is well covered by manufacturing tolerances and overspeccing, but it reduces the possibility of stuttering or other performance slowdowns caused by AMD PowerTune.

What if something goes wrong?

So you flashed the BIOS and your card doesn't work for one reason or the other?
If your card boots fine but does not work reliably in 3D, you can just boot the card and flash back the original BIOS of your card (that's why you should alwayssave your BIOS before doing any flashing experiments.


In case your card does not boot at all you can use AMD's new backup BIOS feature:
  1. Set the BIOS switch (pictured above) in the 2 position to enable the recovery BIOS and restart the computer. This will let you boot the card without problems.
  2. Boot into Windows/DOS prompt and get ready to flash the card - do not start the flashing process just yet.
  3. Set the BIOS switch in the 1 position with the system running and ready to flash.
  4. Flash your saved BIOS to the card.
  5. Reboot, done.
The dual BIOS feature is just an added convenience for easier recovery, it is not a requirement for this kind of modding, nor is it evidence that AMD has planned their cards with unlocking in mind.

Test Results

(Last updated March 28th)

ManufacturerCards
tested
Unlocks and
works fine
Unlocks but
rendering errors
Does not
unlock
AMD1100
ASUS403910
Club3D212001
Diamond8710
Gigabyte484800
HIS717010
MSI272610
PowerColor767330
Sapphire242230120
XFX14614330
VTX3D111010
Visiontek5500